How to Dissuade Yourself from Becoming a Blogger
How to Dissuade Yourself from Becoming a Blogger What a buzz all the bloggers are making these days! It seems like just about everybody is pouring their musings into a text box. Are you feeling tempted to start a blog of your own? Here are some ways to bypass the trend. Steps 1. Find five completely random blogs, and read them daily for a month. After thirty days, you will absolutely dread your self-imposed requirement to read all that dreck. Any blog you create will most likely be on par with what you've been reading. Don't put anyone through that. 2. Consider that your voice, even if it is truly a good one, is a tiny peep against the massive wave of tripe out there. The odds of anyone you don't already know finding your blog are low. 3. Write on a regular basis in a text editor instead. If that doesn't satisfy your urge, and you feel that you must post your blog online, then you might just be craving attention and validation--which you'll never truly find in a blog. If you give up on your Wordpad journal after about three days, you'll do the same with a blog that just takes up server space. 4. Ask yourself if you really have the time to commit to a blog. What about that tree house you wanted to build? Or the book you wanted to write? Or the car you wanted to fix up? Or the restaurant you wanted to take your significant other to? Or the new career you wanted to pursue? Instead of writing about pretty much nothing, or whining about all the things you wish you were doing instead, start doing something that'd actually be worth writing about. And if it's really worth writing about, you'll be having too much fun doing it to tear yourself away from it. More of this at: http://www.wikihow.com/Dissuade-Yourself-from-Becoming-a-Blogger
Vicodin is my friend...
It has been a while since I blogged about home renno, or much else besides running, but for the next couple of days, I’ll be cooped up in bed with my laptop, recovering from a minor surgery. Fortunately, I have recent progress to report. I remember an exercise we did in a philosophy class. Start by walking half the distance between yourself and the wall, then walk half the remaining distance, repeat, repeat again. The question is, if you keep this up, will you ever reach the wall? That is how I feel about the project room. Every time I get a chance to spend a few days up there, we get a lot done, and yet, I think I was probably saying we were almost done about this time last summer. That being said, we are getting dangerously close to done. All the paneling is done. The carpenter has built all the boxes for the shelving on one side and is working on the other. All along, I have helped him do one side of the room and then done the other myself. This worked well with the pine paneling, electrical and sheetrock (for example; I wired all the outlets myself and then he came back and checked them) but I left the fine carpentry to him. It will be a few years, yet, before I weld any biscuits. All that is left is to finish sanding the floor (estimate eight hours), apply two more layers of mud to the new sheet rock and all the repaired seams on the pre-existing sheetrock (4 hours), prime and paint, do the finish work on the paneling (corner edges, ¾ round, filling, etc.), and then seal the floor. I have until mid-September to make progress before things get totally crazy with school and work. We have carved our calendar up between now and then and are actively seeking babysitters for weekend days so we can both work on The Project at the same time. We'll get there. October 1st is the goal – October One, Get it Done!
shelves-all-done
The shelving is all done on one side. Storage will be at a premium. Each boy will get two deep storage bins and shallow book space for about three rows of paperbacks. I wonder if we will still have paperbacks by the time they are old enough to be interested. Each boy will have a total of 12 outlets for all their gagetry.
sheetrock-pre-mud
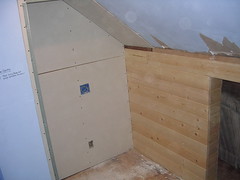
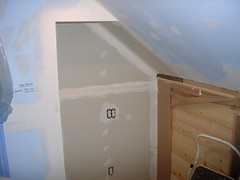
If you have read this blog in the past, you'll know that we tore out the tiny closet in the corner to make way for a study nook with outlets at the floor, desk height and space for a small light in a little alcove above. I debated whether or not to build out a standard size closet here instead (the old one was too shallow to hang cloths in). Eventually I went with setting it up the way we want it to be now. Later, I can frame out and rock a closet in about a day when we get ready to sell so that the room can be considered a bedroom for sales purposes.
sheetrock-post-mud
This was my first experience with hanging sheetrock or mudding. After working with the tongue in groove paneling, sheetrock turned out to be soooo easy. Mudding, which everyone also said was the hardest part of sheetrock didn't turn out to be much of a chore compared to tile or almost anything else we have done. Why didn't I try the easy stuff first?
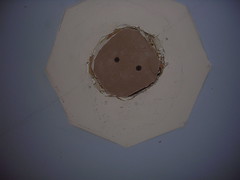
Ceiling-Patch-Before
This has been my first experience with sheetrock - both patching and hanging new. What you see here is the hole left in the ceiling from when I took out the one light in the center of the ceiling an replaced with with four cans in each corner of the room. For this patch I put two small boards up into the hole so that they overlapped each edge. Each board had a screw in it's center that I could use as a handle while I set a screw into each side of it, screwing it down to the cedar boards in the ceiling. With the boards secure, I removed the center screws and screwed a sheetrock patch to the spanning boards.
Ceiling-Patch-Mudded
I'll probably do two more layers of mud before sanding.
|